Wednesday, December 1, 2010

Christmas Ornaments and a gift exchange

My Christmas tree is a little bare. Granted last year was the first year we had a normal size tree (it was our first Christmas as a married couple we spent at home and not traveling), so I decided that I would make a few ornaments this year. My first ornament was a vintage Christmas soldered ornament.
I found some vintage Christmas images put them between 2 pieces of glass and soldered around them. Doesn't take much time, but cannot be done with little ones running around the solder gun gets very hot I even burnt my hair on accident. I did them the same way I made this necklace for my sister one larger. It is about the same size as a wallet sized picture and I think I am going to make some more with our family picture in them.
To add a little flare to it I soldered 2 jump rings on top to thread ribbon through for handing and 3 rings on the bottom to which I added a little bling. I decided to give this particular ornament away to my homemade gift exchange partner.
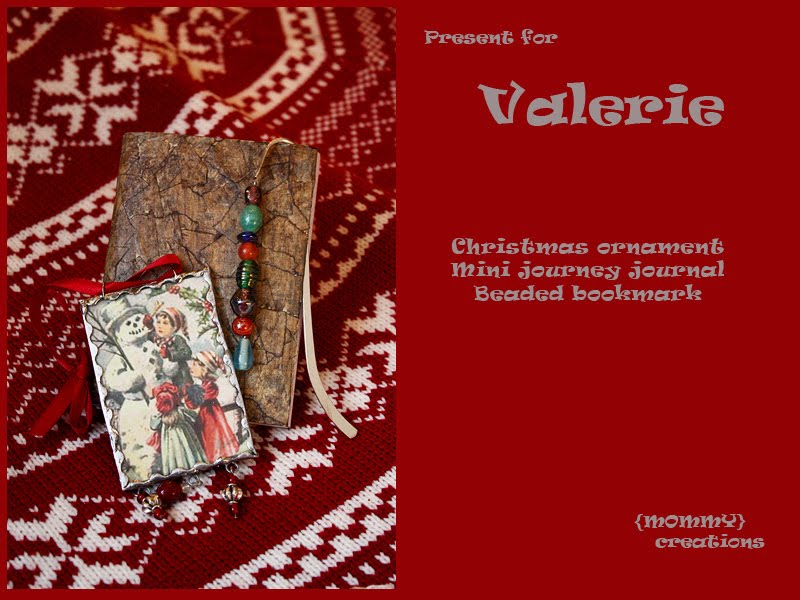
I also made her a couple of things to help her out with her 30 things before she is 30 list. I made a mini journal that she can carry in her purse (tutorial next week)and a beaded bookmark for those books she wants to read.


Linking up here

Wednesday, November 3, 2010

Yummy Gooey Chocolate Caramel Cake and other Birthday Surprises

Last month was my husbands 30th birthday. We wanted to do something special for the big day.
Baby Girl and I made him a Yummy Gooey chocolate caramel cake as requested by the birthday boy, while Bubs so graciously took a nap. Scroll down for cake recipe.
We also made yummy mini cupcakes and cake balls using same recipe to take to daddy's work.
And then that night we had a surprise Birthday Party (that may not have been much of a surprise).
This was my center piece I made for our table and while it is Halloweenish I am still showing you because it could be adapted to any holiday. I made the lollies using this tutorial. And then just added whatever embellishments I wanted buttons, feathers, glitter, etc.The large sparkly glitter one was designed by baby girl. She wanted sparkles and googly eyes. I decorated the sticks with paint, ribbon or more glitter to match. The spiky balls were created by painting a Styrofoam ball (bought in a package at the dollar store) yellow and then hot gluing candy corns to them. Side story, my husband hates candy corn and when he saw the bag of candy corn on the table he freaked and said no one in his house was eating that crap (in a funny, but serious way). I had to inform him we would not be eating it I was using it to make decorations he was ok with that, just no eating of the stuff. I used another styrofoam ball and painted it black for a spider using black pipe cleaners for the legs. To keep all my skewers up right in the vase I filled it with my husbands favorite candy (he allows the eating of M&Ms and chocolate bars) too bad the candy only lasted for about a week then all my skewers tipped over, so maybe it is better to fill the vase with something non-edible.
I also made these super easy super cheap stands for the food. I like to have my food at different levels on the table it gives more interest. Since I only have one cake stand and I was using it for the cake I took plastic plates and bowls from the dollar store then hot glued the bowls to the bottom of the plates some getting one bowl and some getting 2 creating the different platter heights. best part was the were cheap and disposable so I didn't have any extra dishes to wash, but it you want a fancier look you can do the same thing with real dishes.

Happy 30th Birthday Sexy. I love You!!!!!!!!!!!!!!!

Yummy Gooey Chocolate Caramel Cake

Chocolate Cake

1 box of your favorite chocolate cake mix
1 small package chocolate pudding
1/2 cup sour cream
1 1/2 cup milk (or half and half)
3 eggs
1/2 package mini chocolate chips

Mix all ingredients and back in bunt pan for 50 min.

While cake is backing prepare caramel gooeyness (made up word I know)

1-cup (2 sticks) butter
2 cups packed light brown sugar
1/4-cup milk
1-teaspoon pure vanilla extract

In a saucepan, combine butter, brown sugar, and milk. Cook and stir over medium heat for 3 to 5 minutes. Remove from heat and stir in vanilla.

When cake is done baking remove from pan on to cake plate and pierce it multiple times with a straw, then pour the caramel over the cake. I do it a little at a time to let some seep into the cake before pouring on more.

For the frosting (taken from Paula Deen)

1/2-cup (1 stick) butter
1 cup packed dark brown sugar
1/3-cup heavy cream, or more if needed
1 (16-ounce) box confectioners’ sugar
1-teaspoon pure vanilla extract

Melt butter in a saucepan over medium heat and stir in brown sugar and cream. Bring to a boil, and transfer to a mixing bowl. Add confectioners’ sugar and vanilla. Beat with a hand-held electric mixer until it reaches a spreading consistency. At this time it may be necessary to add a tablespoon of heavy cream, or more, if frosting gets too thick. Just be sure to add cream is small amounts because you can always “add to”, but you can’t take away.

For the cupcakes and cake balls I used the same cake and frosting. Cake balls were made by mixing the baked cake and frosting then forming it into balls and placing them on a cookie sheet. I then place the balls in the freezer for about an hour so they stick together. Then I dip it in melted chocolate and stick them back in the freezer to harden. (If you google cake balls I am sure you can find a more detailed recipe for cake balls if you prefer. Maybe someday I will do a detailed tutorial.)

Happy Baking and checkout these linky parties for more inspiration.

Friday, October 15, 2010

Trick Your Pumpkin

See that boring old pumpkin from the dollar store? Remember how I said I wanted to change it up with some paint? Well I did it. I transformed it into a chalkboard.
I spruced up my pumpkin to enter it into the Plaid Trick Your Pumpkin contest.

I was browsing plaid paint products to decide how I wanted to trick my pumpkin. I had lots of ideas, glitter, mod podge lots of options, but ultimately decided on chalkboard paint.
There are so many different colors to choose from. I thought orange chalkboard would be fun. My local Joann's didn't have orange so I went with black, but sometime soon I will do something cool with colored chalkboard paint.
The fun thing about the chalkboard pumpkin is the ability to change up the face based on how you feel that day. It also keeps toddlers entertained for about 20 min.

Sharing the linking love

Tuesday, October 12, 2010

Apple Skirt and Tutorial

I have apparently started a tradition of making an apple picking outfit every year. You can see past years dresses here and here. It wasn't necessarily my intention to make this a tradition, but after making dresses 2 years in a row and seeing this very cute corduroy at Joann's I thought why not and this is what I came up with.Isn't it cute? I thought so and decide that some of you might think so too so I am going to attempt a tutorial.
You will need about 1/2 a yard (depending on your size I made a 2T) of 2 coordinating fabrics. I used a printed corduroy and matching solid color cotton.
To get the right size measure your child's waist size (19 in for me). Also measure from waist to knee, or however long you want the skirt and add an inch(mine is 12 in). Now that you have your measurement cut either one piece twice as long as your waist measurement by your length measurement (this will make one seem in back)or cut 2 pieces your waist measurement by length measurement (creates to seems on side). You will do this for both of your materials.
Now take the right side of the pattern material and match it up with the wrong side of your solid material then sew it together. Now you have one big piece (or 2 big pieces). Next sew the sides together by folding the piece long ways so that the right side of the pattern material and the wrong side of solid material are on the inside. Sew up the side. If you have 2 pieces then just line them up on top of each other and sew up both sides. You should now have a tube. Now fold the pattern material over the solid material. You now have a tube with right side of pattern material on out side.
Top stitch near top where you sewed the to types of material together. This will keep the material in right orientation. The bottom should have to raw edges the pattern material and solid material. Hem these separately, hemming the pattern material shorter so that the solid peeks through under the pattern.
Now we are going to pleat the front. Make a mark in the center of your front panel then make a mark every 2 in. Use these marks to help you make your pleats even. I made three pleats on either side of my middle mark. Sew your pleats down by sewing a straight line across all pleats about an in or so from top.
For the back I cut a piece of elastic half the size of my back panel and stretching it across the length of the back panel sew it on about an inch from the top.
Now you have a skirt. For the cute little pink belt I just sewed a tube of material the length I wanted turned it inside out and sewed the ends closed. I tied the belt over were I sewed the pleats and elastic down. This made it so there is sort of a ruffle sticking out over the top. So, this skirt is meant to be worn with a shirt that is tucked in.
Since I had scraps and since my daughter informed me that her doll only had PJs I made the doll a simple little matching skirt.
You can make the doll skirt the same way or simplify it like I did. I measures The dolls waist and cut apiece of elastic that size. I then sewed 2 strips of the pink material on either side of the apple material that was twice as long as the elastic (or piece scraps together to make a piece twice as long as your doll's waist)
Sew your loose ends together forming a tube. Then fold your 2 pink strips under and sew in the ditch as shown in picture. One side is now the bottom him and the other is the top where you will insert elastic and sew together.
So there is a simplified matching doll skirt tut. I hope it makes since.
Once you have your outfit you are ready to go pick apples. I also made a little clip by cutting out one of the apples and gluing it to a clip.
My husband was making fun of me when I felt bad I hadn't made Aidan an outfit. He said "because Aidan is going to look back on these pictures and feel bad he did have an outfit." sarcastically of course. So just in case he did look back I appliqued some apples on an onsie so they were matching.
There you have it an apple skirt, matching doll skirt, clip and onsie all in one, perfect for an afternoon of apple pickin'? Now what to do with the apples. Here is what I did last year.


linking up with these awesome gals.

Tuesday, October 5, 2010

Hi Hat Cupcakes

What is better then a fabulous tasting cupcake? A fabulous tasting cupcake that looks impressive and if I do say so these Hi Hat cupcakes are just that.


These come from Martha Stewart however I did not follow that recipe (if you haven't figured it out yet I don't like following recipes). I don't know how those cupcakes taste, but mine were delicious, toot, toot (that's me tooting my own horn). Here is my chocolate cupcake recipe. Its super easy
1 chocolate cake mix
1 small box instant chocolate pudding
1 1/2 cup milk
1/2 cup of sour cream
3 eggs
1/2 bag mini chocolate chips

Just mix it all together and put it in your cupcake tin and bake at 375 for 20 mini (less time if making mini cupcakes longer if making a cake)

I ate many of these cupcakes before I even frosted them they were that good.


This delicious looking frosting was made using the recipe from marthastewart.com. The frosting was pretty good, but my husband thought it was too sweet and it was a little grainy. I have been thinking if I could make a light weight frosting like this using powder sugar so it wasn't so grainy. Oh, and since I was serving these to children and a pregnant lady I used meringue powder instead of egg white (just look on container for substitution amounts).
I placed the frosting in a zip lock bag and cut the tip off and piped it on the cupcake as high as I could.

So make a delicious chocolate cupcake top it with sweet light frosting and then dip it in chocolate how could it get any better than this. I found the mini cupcakes easier to dip.

My two year loved helping me make this for her friend Caleb's birthday party at playgroup. Caleb's mommy is pregnant, been there done that with a toddler and knew making cupcakes is not always what you want to do with your free time, eating them yes that I liked to do when pregnant. The day of the party it was raining and I was trying to get inside with a toddler, baby and a platter of cupcakes. I gave the cupcakes to the toddler who held onto the cupcakes with both hands instead of holding onto the stroller and with me moving a little faster to get out of the rain lost the toddler with the cupcakes off the stroller. Addi was more devastated by the few cupcakes we lost to a puddle in the parking lot than her scrapped knees.


These cupcakes took a little more time then normal, especially the frosting, but they were fun and oh so delicious. To see beautiful pictures of Hi Hat Cupcakes and my inspiration for making these visit Bakerella.

Sharing the Linky Love

Monday, October 4, 2010

Let the Spookiness Begin

Now that it is October I can put my Halloween decorating into full swing. I'm weird about decorating to soon for holidays. I hate when Holidays get skipped, like did you know that there is already Christmas stuff up in the store? What happened to Halloween and Thanksgiving? Anyways, in case you missed this over at Under the Willow here is my first Halloween decoration I made this year.
All supplys came from the Dollar Store a vase, a candle stick, plastic skulls and some peat moss.
I put mine on my entry way table along with other Dollar Store finds (I love the Dollar Store).
Adding spiders and webs to things can make anything look spookier. I cover everything in my house in spider web at Halloween time, just make sure you remember where you put it or you will look up months later an realize your clock is still covered in spider webs.
I love this fun picture. I think I'm going to re-frame it in a real frame so it looks more like a real picture and not just a Halloween decoration.
Check out my post at Under the Willow to see how you can your new vase stand for other holidays as well.

Sharing the Linking Love

Monday, September 20, 2010

FlufferNutter

What in the heck is a FlufferNutter? Well remember my S'More post where I talked about Fluff?
Fluff seems to be an east coast thing as I have heard you can't buy it out west (but to be it seems to be the same as marshmallow cream). Well if you make a sandwich with peanut butter and fluff you get a fluffernutter.
Behold a FLufferNutter. No I did not make that name up it is written on the back of the Fluff container. It seems this is the main use of Fluff since I found the fluff next to the peanut butter at the grocery store. My husband thinks they are gross, but he has never eaten one himself. He was also horrified that I introduced them to our daughter. However, I looked at the nutritional stuff on the container and Fluff has less sugar and less calories than both Jam and honey. Now I am not saying Fluff is better for you, but the less calories thing is something to think about. Well have I intrigued you? Do you all want to go out and get you some fluff? (No I am not getting paid for this)

Linky Parties

Thursday, September 16, 2010

Mixed Media Art Canvas:Blog Swap Under the Willow

Today I am doing my first ever blog swap so you can find me over at Under the Willow. Under the Willow is run by a very amazing person who taught me all my craftiness, my mother. So enjoy this tutorial from the true Mommy of Mommy creations then head over to Under the Willow to see what I have made and some other things made by my wonderful mother.

Thank you Jessica for inviting me over to Mommy Creations.


I had a lot of fun with this project and found it really relaxing to do. No rules, so No mistakes. I started out with a base coat of paint on a 11X14 canvas then went from there. Some paper, some decoupage, stamps, inks, shimmer spray, stencils, die cuts, and misc embellishments.


{key and keyhole were cut from Tim Holtz grunge-board; die-cut chair with 3-D crystal lacquer}


{black shimmer spray with fleur de lys stencil; small frame embellishment}


{stamped D ; decoupaged clock paper ; rolled burlap flower on tag}

You need to try this. I was inspired by Jana @ CreatingScrapbooks.com. I love all the techniques she used, Watch her YouTube video. I think the trick to this is layering.and texture. But like I said No rules.

Thanks Susan for sharing and thanks for participating in my first ever blog swap. If you are interested in doing a blog swap contact me at mommycreations(at)gmail.com

Linking up to these parties.

Tuesday, September 14, 2010

Me Want Cookie!

This past weekend I photographed a 1st birthday party with an Elmo and Cookie monster theme. As I was going through the pictures my daughter saw the picture of a little cake (made for the birthday boy to smash) with cookie monster on it and instantly proclaimed that she wanted cookie monster cupcakes. This idea has been in her head ever since and she is constantly asking to make cookie monster cupcakes, so today after playgroup I decided to help her make some cookie monster cupcakes.
This is what we came up with. They are chocolate chuck cupcakes with blue buttercream frosting.
We made the fur by piping the frosting on with a cake decorating tip (the one normally used to make leaves). And we used chocolate chips for the eyes and mouth.
Of course there can't be a cookie monster without cookies. We used cookie crunch cereal for our mini cookies.
There are the perfect size to fit into cookie monsters mouth, but bigger cookies would be fun too.
So after days of begging for cookie monster cupcakes here they are. I confess that not all the cupcakes were made into cookie monster and not all of them turned out,
but she didn't seem to mind.

I am linking this project up with
and other friends here.